Showing posts with label Edibles. Show all posts

Saturday, July 23, 2011

Isn't nature beautiful?

Well here a visual update of my garden. It continues to amaze me every night as I go out to water. Unfortunately I've had one casuality, the tomatillo (Mexican Green Tomatoes) plant. It never produced more than flowers and after researching online it apparently needed another plant to cross pollinate with. Which was too bad as it grew so big and tall and had about 100 flowers on it.
Also I think my corn has stopped growing. It's hasn't gotten any taller and doesn't look it will grow up big and strong and be ready for a grill anytime soon. I might be because the ground over there isn't as fertile since the tree was mostly growing there. Oh well I figure so far not bad for my first garden.
I'm super excited about my eggplant. Chris at work was telling me eggplant prices have jumped this year as they had bad crops, so my black beauties will be worth something to share with others.
And I'm finally seeing actually lemon cucumbers emerge. If the amount of flowers is any indication of how many I'll get, I'll be giving some of those away too! I'm not sure how long zucchini produce from but I'm certainly glad I only have one plant as it continues to give me at least 2-4 a week to pick.

Zucchini continuing to blossom
A bee finds a blossom to pollinate with
A big black beauty of an eggplant was hidden under some leaves
I think I finally see some color change on my tomatoes
(this is one from my co-worker Monica who grew it from seed)

The beginning of what I hope is many lemon cucumbers
More black beauties beginning to drop
Perfect Pearl Tomatoes

Saturday, June 25, 2011

You GROW Girl!


Garden Boxes May 22, 2011

Well I know I said I would try to post more often this year, but so far there hasn't been much to post. My knee is still causing me a lot of problems and pain. I haven't been very active until recently. Might be that the weather is finally warming up, but really everything seemed so deary before.
Where to start, well after almost getting selected to be on Turf Wars (see my post from last July on Kimberly's Turf Wars for more details on what the show is) only to be told my street is too busy for them to film, I decided to start my own backyard makeover. I'm tired of every summer coming out and wishing the backyard was just DONE and all I had to do is maintain it.
Well its nowhere done, but its a little closer. My neighbor has been asking me for sometime to remove an oak tree that mostly hangs in her yard. While it provided a lot of shade for me, it provided a lot of clean up on her side. Plus it did shade the entire side I wanted my garden boxes to go. My mom and I had built a garden box probably more than 2 years ago and I had yet to use it except to store weeds and debris in while cleaning up the yard.
So I decided to increase my credit card debt a bit more and have the tree removed. My neighbor (yes the one who has been asking me to remove the tree) had a recommendation for a good cheap tree guy. Luckily he was. He quoted me $450 to remove the tree, after getting permission from the state as it turns out Valley Oak are protected trees, another $75 for trimming back the mock orange, $25 for removing my butterfly bush I poorly planted back there. I figured since Turf Wars won't be doing it for free, this was the best deal.
They showed up bright and early and right on time (shocking for any of you who have hired contractors), by the time I left an hour later they had half the tree gone. My mom was here to
supervise, and pay them for me, sent me an email an hour later saying they were done with everything and took out another renegade tree I had for free and cleaned up after themselves.
Sideyard May 14,2011 after tree removal

Sideyard ready for a garden May 14, 2011

You don't really realize what all space the tree took up until it was gone. I felt so exposed to my neighbor and immediately wished I didn't remove the tree. The following weekend my mom, dad, stepmom Cindy, sister and niece all came down to help me do some projects around the house including building another garden box. My dad and Cindy have built plenty of garden boxes at their own place, so they were kind enough to provide the free wood and put one together.
Since there were so many cooks in the kitchen, it took all day to build the other garden box and the following weekend my mom and I went shopping for all the veggies and dirt. I had NO idea how much dirt these boxes would take. It ended up taking over 18cuft of dirt to fill both garden boxes and repot the Lemon tree and pot my new Olive Tree (a.k.a. Ollie). I ended up planting the following veggies: Zucchini, Artichoke, Eggplant, 2 types of Corn, 4 types of Tomatoes, Lemon Cucumber, Sage, Basil, Green Onion, Italian Parsley, and Olive tree.
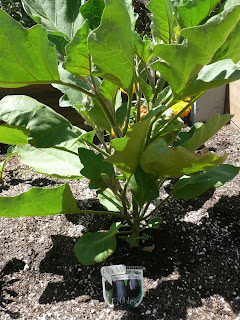
May 22, 2011
This box has eggplant, artichoke and zucchini

This box has green onion, 4 different tomato plants, sage, basil, lemon cucumber and Italian parsley

I thought let's try to grow some corn,
had to immediately cage it as Charlie thought it was a weed to chew on
Mr. Ollie (Frantioi Olive Tree) finds a new home in the old lemon tree spot

The next few weeks I continued to water, even though for some reason Mother Nature did most of the watering by not realizing it was Spring and having temps in the low 70s and raining. This did not please my Lemon tree who promptly dropped all it's leaves from the shock of being repotted and then having no sun to help it along. I kept hope that it would recover as I've had that lemon tree for over 8yrs. I kept a vigilant watch over my garden and lemon tree. I also planted a forsythia plant that dad and Cindy brought me in the ground and hoped everything would make it through the rough weather.
Lemon tree loses it's leaves

Luckily the weather caught up with the calendar and the second weekend of June I saw new growth in all my plants. I had a few zucchini blossoms (always heard chefs making recipes with them, but I want mine to grow into actual veggies). My tomatilo plant was covered in yellow buds, but my other tomatoes had nothing. My basil from Trader Joes was growing so well, I even had enough to give some to my mom and her friend John who lives down the street and stopped by for a visit. And luckily my lemon tree started to show signs of regrowth!
June 16, 2011
Zucchini, artichoke and eggplant
Those wonderful zucchini blossoms
The tomato/herb garden
Tomatilo plant is exploding with buds
Lemon tree comes back to life

The next week was filled with more sun and A LOT more growth. My tomato/herb planter box is completely filled with green leaves and yellow buds. My lemon cucumber is finding a place to climb. My tomato plants are all about waist high and showing lots of potential for many tomatoes. My zucchini plant is bigger than I ever expected. I have countless number of blossoms and even have 2 almost full grown zucchinis. My eggplant is looking great and growing strong. The biggest surprise to me is my corn. I never thought I would be able to grow it, let alone have it produce 3 ears. I always thought this was a back East type of veggie, but I can't wait to grill them up.
June 25, 2011
Charlie watches over the bountiful garden
Zucchini plant, how much bigger is it going to get?
More zucchini blossoms than I know what to do with
Eggplant, big and ready to start showing some veggies
Sage, Basil and Italian Parsley thrive along with the tomatoes
Light shines on a new tomato bud
Lemon cucumber start their climb
Green Onion ready to pick
Corn, 3 stalks, get the grill ready!
And most of all my Lemon tree is coming back big and better than ever. The new leaves are growing so fast and I hope to finally have lemons next year, since I haven't had one in over 5yrs. Mr. Ollie is doing well, especially since I trimmed back the rose bush near him and he gets sun all day. The roses are also in full bloom and giving off wonderful scents through my bedroom window. I'm always surprised how fast they recover from being cutback to nothing and coming back bigger, full of color and that wonderful rose scent. I can never have enough to fill the house with their scent.
Lemon tree coming back strong and green
Ollie is happy and at home by the fountain
Roses outside my bedroom window
The perfect rose that smells as good as it looks

I'll keep posting updates to the garden. It looks like its going to be a wonderful SUMMER!

Sunday, December 20, 2009

Seeing Red

As we draw closer to the Christmas deadline, I ventured out into the crowded territory known as Target on Arden and Fulton. Whenever I know it's going to be super crowded in the parking lot I usually end up parking closer to the garden center as it's always less crowded there. As usual I was right. I got in and out in no problem, even spending under $40 for last minute supplies.
I then pushed my luck and went to Cost Plus. That's where the real damage began. First I spent a good hour wandering the store wondering should I get this or that, even though all my Christmas shopping has been done and looking for a box for a gift. Instead I end up spending close to $50 in there. While trying to pull out of my spot a HUGE truck decides to squeeze into the compact spot next to me, leaving me little room for error. It's times like today in the parking lots where I was cut off 3 times by people who then in return gave me dirty looks when I tried to remind them it was my turn and parking so close that you have to get in your car through the passenger door that you just want a big piece of crap car to just run into other people and not care. But I finally made it home to unpack, eat lunch and then make some cupcakes for the potluck tomorrow at work.
Now I've never made Red Velvet cake mix before and after today not really sure I will again. I've heard many people tell me it's their favorite, but I think this was the first time ever that I didn't lick the bowl clean. It looked like a bloody mess and that just isn't appetizing. Plus it doesn't really taste like chocolate or anything else. It's its own unique taste, one that I didn't really care for. But haven't topping it with cream cheese frosting and cake sprinkles it had more of an appeal. I'll bring as many as I can fit into the cake tin to work and the other to my neighbors, thanks to these handy little boxes I found at Cost Plus.

I think it also didn't help today that I dyed my hair Egyptian Plum and when rising it in the sink looks like I was trying to commit suicide instead and filled the bowl with blood red water. Even though it turned out like I wanted (dark brown burgundy) I think I will stick with color and taste I know, like Dark Brown haircolor and Devil Food's cake mix.

Saturday, November 28, 2009

Thanksgiving 2009

Well the holidays are officially on, starting with Thanksgiving with the annual feast of turkey and green bean casserole and family gathering. I took off work early on Wednesday to start my cleaning and cooking as the family was coming to my house as usual (my sister gets Christmas and Easter, I get Thanksgiving and Mother's Day).
I thought it would be better to first make the pumpkin pie the night before, just in case I messed up I would have time to make another as I bought back up ingredients such as pie crust and extra can of pumpkin. Now I have never made pie crust from scratch, let alone a cookie pie crust. This was to be made out of gingersnap cookies and almonds (gluten free as one of my friends pointed out). Not having a proper food processor, I took hammer to cookies to break them down enough to resemble crumbs for the crust. I mixed in melted butter and then tried to press it into the pie pan, but it didn't seem to go evenly and still seemed quite crumbly. But I got it in there and baked it for ten minutes and then set aside to cool.
The mixture was easy to put together and included a lot of good smelling spices (cloves, cinnamon and ginger). I poured it into the crust and put it in the oven for over an hour until the middle wasn't moving anymore (they always tell you that it will still jiggle somewhat but will set and it never fully does for me so I just cooked it all the way to make sure). The house started to smell of spices and crust and let me know the holidays were about to begin.
You can find the recipe for the pie at the following link: http://www.oprah.com/recipe/omagazine/recipes/200911-omag-recipe-pumpkin-pie (note that I omitted the cranberry sauce portion of the recipe)

Next day I woke up early to start working on the Turkey (Free Range, Organic Hormone Free Trader Joe already Brined bird). I thought it was completely thawed until I went to remove the innards and of course found ice inside. So as I let cold water run through the bird I started my hours of vacuuming, swifter, sweeping and vacuuming again as my sister likes to make a hobby of pointing out how much dog hair I have in the house. I have two dogs that live indoors, there will be dog hair no matter how much I clean.
Dogs banished outside for the day

Finally the bird was ready for it's herb rub bath. I watched a lot of Food Network before today and found a herb roasted turkey by Ina Garten that looked easy and sounded too tasty. (http://www.foodnetwork.com/recipes/ina-garten/herb-roasted-turkey-breast-recipe/index.html) She used it for turkey breast but I figured it would translate to a whole turkey just fine. After cleaning, drying and removing all the unwanted parts of the bird, I slowly worked my hands under the skin with the olive oil mixture. It was much easier than butter which I usually used. I then put some white wine, sage and garlic in the bottom of the roasting pan and placed it all in the oven.
It only took about half hour before the house filled up the with the most wonderful aroma. I can't even describe how good it smelled, but I knew I had picked the right herb mixture for the bird. It took about 3 full hours to cook the 13.5 pound turkey, but once I brought it out of the oven I knew I had cooked the best bird YET!
While we let the turkey rest mom, Fonda and grandma cooked up their side dishes in the oven. The classic menu of green bean casserole, candied yams, stuffing and homemade cornbread. Everything came out perfect and tasted the best it could. I guess that is what happens when everything is made from scratch and with love.... After the meal we settled down on the couch and watched the movie Up. We played Mastermind (which wasn't as difficult as I remember, except for mom). After dessert Fonda and I defended our winning streak at Pictionary against mom and Jasmine. It came down to the closest game yet as both teams were on the final spot, but Fonda and I won the game like the true champions we are. But still Jasmine is getting a little too good now at these games. I guess that is what happens as they get older. She can still kick all our butts at any Wii game though. Which we will find out on Christmas. I hope everyone had a great Thanksgiving and now the holiday season officially begins.....

We get ready to feast

Tuesday, November 3, 2009

Hunger Busting Chili

Last week at our company's annual Chili cook-off I got pre-taste of one contestants chili as I went in for my morning oatmeal. Already by 9am the smell of spices and meat were thick in the air and I could smell it from my cube around the corner. Most of the chili's are red and thick with sauce and meat, but my friend Jenny's was more clear and full of ground turkey. The smell of cinnamon and cumin struck me first and then I couldn't wait to try it. A healthy chili, yes it's true and yes it's very good. At the cook-off I filled my dish up with her chili along with samples of others. Jenny ended up winning most colorful, but I think it should have won most unique and tasty category. I asked her immediately for the recipe and even took leftovers home with me and had them for dinner the next night.
I got the recipe from her and couldn't believe how simple the ingredients were. She said for a double recipe the cost was about $30 for 12 servings. Not bad. I decided to make it up tonight so all the yummy spices and flavors could soak in for a great lunch tomorrow, and from the looks of it many after.
First you will notice is the smell, it's sweet and cinnamony (its a new description). I made the regular amount and it looks like enough chili to last a few days and nights. Which is good since I'm on a budget and need to eat healthier. In this chili you have 3 beans (chickpeas, black beans and kidney beans) and ground turkey so LOTS of protein in there (30g in fact). It's low fat (5g) and low calorie (292 a serving). I used the low sodium beans and chicken broth to keep it less salty. But overall the taste is great and if you have some artisan bread to dip in it, it's a perfect new healthy chili to enjoy all winter. Now if they weather would just realize it's fall and not be 80 degrees in November it would be perfect.

Recipe:
1 Tbsp Olive Oil
1 small white onion chopped
1 lb lean ground turkey
1 can diced tomatoes with jalapenos (or chilis in this case)
1 10.5 oz can each of chickpeas, kidney beans and black beans, drained
1 can low sodium chicken broth
1/4 tsp each salt and cumin
1/8 tsp each cinnamon and cayenne pepper

In a large pot, heat the oik on medium-low heat. Add the oino and saute until soft (about 3 mins). Add the turkey and brown it (5 minutes). Add the remaining ingredients. Stir and bring to a boil, then reduce heat and simmer for 20 minutes. Top with low-fat shredded cheddar, if desired.

Monday, September 28, 2009

Chicken Cacciatore

Well tonight I had to cook up the chicken I bought last week (it's been in the freezer until yesterday) before it went bad so I pulled together all the ingredients I had for Ellie Krieger's version of healthy Chicken Cacciatore (don't really know what an unhealthy version is, since I can't say I've ever made or eaten it before tonight). Plus it's been a few weeks since I've tried a new recipe out.
This recipe had a few more ingredients needed than the usual recipes I have been trying out, but I figured why not give it a try since I had everything. In the cookbook she describes it as a recipe that checks all the boxes, it's easy to make, everyone loves it and you can prepare it in advance and refrigerate or freeze leftovers.
Lets take it one step at a time - Easy to make. For the most part it is. Not a ton of chopping, except for the teary eyed onions and sweet smell of red bell peppers. I bought the pre-sliced mushrooms so that saved me a step and also had chicken strips instead of bone-in breast as they were cheaper at Trader Joes (only all natural cage free chicken for me). I read the instructions carefully as I usually don't and just end up throwing in all the ingredients at once without thought and then realizing afterwards there is a process to follow and a reason why. Sauteed the onions and bell peppers after browning the chicken (transferred to a plate in the meantime). Then browned the mushrooms and added coking white wine to reduce. Now I don't usually have wine on hand as I don't drink it and had a bottle of cooking white wine that I used instead, don't know if this makes any difference at all, but the headed the warning on the label and did not consume any as I cooked (plus it smelled too strong). I then added the tomatoes and spices and simmered for ten minutes before adding the chicken back in to cook. Now the only thing I would change here would be to lower the stovetop temperature as after the allotted cooking time the sauce had all reduced own to a browning (some would call burning) mess stuck to the bottom of the pan. I've seen on TV where their deglace it with wine or something, but I'm not that skilled so I just had a more caramelized version than intended.
Second statement- Everyone Loves it. Before tonight I've never had Chicken Cacciatore. If I'm having Italian food it's usually some heavy pasta dish in a cream sauce, I mean really who wastes their tastebuds on a tomato based sauce when eating out??? But I thought since I'm trying to eat healthier and so far have liked everything I've made from Ellie's cookbook, why not. Again cooking anything that involves onions and garlic makes me instantly like the meal more. I always feel more like a cook when the house smells of an Italian restaurant. At the end of the cooking process the wine in the sauce seem to be the overpowering scent and made me wish I had a nice vino to accompany my dish. But I only had the cooking wine or red wine vinegar, not a good choice either way so I stuck with my mineral water. I added a little rice pilaf and topped it with the chicken creation. I must say I really enjoyed the dish. I think the burning (browning) of the tomatoes, onions and peppers helped as I do like the tasted of burnt food, but it seemed more like it was supposed to be caramelized on purpose. The chicken was tender, even though I think I cooked it too much in the early browning portion of the cooking. Because the sauce was reduced down it wasn't running or too saucy. I would highly recommend giving this recipe a try if you want to make a healthy Italian meal. You can top it over spaghetti or fusilli pasta.
Last step - refrigerate the leftovers and if you want to make it a little unhealthy add some fresh made garlic bread and don't forget the glass of vino! Mangia, Mangia!


**Too dark to take a photo, had to steal off the internet

Recipe:
4 skinless bone-in chicken breast (approx 2.5 pounds)
1/4 tsp salt, plus more to taste
1/4 tsp black pepper, plus more to taste
2 tsp olive oil
1 med onion, cut in half, then thinly sliced into half-moons
1 med red bell pepper, seeded and cut into thin strips
8oz thinly sliced white mushrooms
2 cloves of garlic, minced
1/2 cup dry white wine
1-4.5oz can no-salt added diced tomatoes with their juices
1/2 tsp dried oregano
1/8 tsp red pepper flakes

Rinse the chicken and pat dry with paper towels, then sprinkle with salt and pepper. Heat the oil in the a large skillet over med-high heat and brown the chicken on both sides, about 8 minutes. Transfer to plate and set aside.
Reduce the heat under the skillet to medium. Add onion and bell pepper, cover and cook, stirring a few times, until the vegetables begin to soften , about 5 minutes. Add mushrooms and cook uncovered and stirring occasionally, until the mushrooms begin to brown, about 10 minutes. Add the garlic and cook, stirring, for 30 seconds. Add the wine and cook until reduced by half. Add the tomatoes and their juices, the oregano and red pepper flakes and simmer, covered for 10 minutes.
Return the chicken breast to the pan and simmer, covered until they are just cooked through, about 15-20 minutes. Taste and adjust the seasonings with salt, black pepper or red pepper.

Thursday, September 10, 2009

Easiest Chinese Chicken Salad

Tonight I got home from a long day at work, catching up with all my Folsom office buddies I haven't seen in awhile as I've been stuck down in our Arden office for what seems like MONTHS. I hadn't really planned a meal and that is usually when I look at the dogs for confirmation about wanting to go for a ride through a drive-thru. Instead I looked in my frig to see what I could come up with and then remembered a Chinese chicken salad recipe in the Food That You Crave cookbook. Monday I had cut and browned a chicken breast I had left in the refrig from the weekend and then pulled out the last of the scallions and had a bag of coleslaw cabbage mix. I put this dinner together during a commercial break (can't miss a bit of Project Runway).
I took the coleslaw mix which is already chopped into great bite sizes. put the chicken cubes in a bowl along with 1 tbl low sodium soy sauce and 1/2 tsp of sesame oil and mixed it around and add it to the chicken in small bowl. I then found some slivers of almonds I had in the back of the pantry.
For the dressing I used 1/2 cup of rice vinegar, 3tbl soy sauce, 2 tbl canola oil, 2 tbl brown sugar and 1 1/2tsp of sesame oil. Whisk it up and then toss the cole slaw mix with chopped scallions (3), the flavored chicken and then topped it all off with almonds and chow mien noodles for extra crunch.
It was great and quick. Like the magnet on my freezer door says, If you are what you eat then I'm fast, cheap and easy! If you have some mandarin oranges to throw in there is would be fabulous, but I did not.
I put the the remainig scallions in a small tupperware and the same with the remaining dressing and will have it again for dinner tomorrow night. Now I'll just need to think of a good Friday night dessert to go along with it. Did I hear the dogs say Baskin Robbins has a drive-thru?

Monday, September 7, 2009

Gâteau au Citron

If you haven't guessed by now I LOVE lemon and add in French-style I knew right away I had to try it. The recipe comes from the book Homemade Table. Again very simple ingredients and lots of lemon. The mix itself was very simple and quick to make, the only substitution I made was using whole wheat flour instead of regular unbleached version. I think that might be why the cake turned out darker than expected, but without any pictures to reference to I'm not sure what the outcome is suppose to be (only compliant about the book, NO photos). I'm a visual learner and without photos for reference I never know if I did it right or not. I'm guessing with my first try, NOT. It isn't that is doesn't taste good or light and fluffy, but the middle completely fell making it look more like it was trying to become a bundt cake with a hole in the middle, but instead just looks sad. And the icing isn't going to cover my mistake.


But at least it still tastes good. I think with using regular flour it was taste less , humm, healthy (and maybe wouldn't have fallen). The cake itself isn't as lemony as I expected, in the book she suggests putting on a syrup for more added lemon flavor, but even for me I thought that was too much, but might try it next time. So I just stuck with the glaze/royal frosting, which ended up tasting like a liquid lemon drop, almost too tart and sugary for me (I know I can almost hear all the gasps). On her blog comments, someone changed up the icing with a chocolate glaze which I think would be good too, especially if you added in the lemon syrup when the cake is fresh and hot.
Unfortunately my cake wasn't as pretty as I hoped (from the picture below you can see the ski jump it made in the middle) and I will have to cut it up into squares to take it to work to finish it off, as I can't eat it all myself as I'm almost already in a food coma from this weekend. But I would definitely try it again with regular flour and instead of vegetable oil using olive oil for a more robust flavor. Hopefully that one won't collapse on itself and turn out as pretty as a French cake should.


For the cake:
1 jar plain yogurt
2 jars granulated sugar
3 large eggs
3 jars unbleached all-purpose flour
2 tsp. baking powder
2 tsp. grated lemon zest
1 jar canola oil

For the glaze:
Juice from 2 lemons
1/2 jar powdered sugar

Preheat the oven to 350 degrees Fahrenheit.

In a large bowl, combine the yogurt, sugar, and eggs, stirring until well blended. Add the flour, baking powder, and zest, mixing to just combine. Add the oil and stir to incorporate. At first, it will look like a horrible, oily mess, but keep stirring, and it will come together into a smooth batter. Pour and scrape the batter into a buttered 9-inch round cake pan (after buttering, I sometimes line the bottom with a round of wax or parchment paper, and then I butter that too).

Bake for 30-35 minutes, until the cake feels springy to the touch and a toothpick or cake tester inserted into the center comes out clean. Do not overbake.

Cool cake on a rack for about 20 minutes; then turn it out of the pan to cool completely.

When the cake is thoroughly cooled, combine the lemon juice and powdered sugar in a small bowl and spoon it gently over the cake. The glaze will be thin and will soak in like a syrup.
Serve.

Sunday, September 6, 2009

Lemon Chicken Orzo Soup

Labor Day weekend finally is here and gave me more and more opportunities to cook and shop, two things I love to do. I've noticed the more I'm cooking the more pots and pans and utensils that I'm lacking. So before heading to the store to buy all my ingredients to make several recipes I've earmarked in several cookbooks (including watching Food Network as usual), I decided to get some of my kitchen supplies in order. I headed to Target as I figured I could find what I needed cheaply and pick up some new lipgloss too (a girls got to stay pretty even while cooking). So I got a spring release cake pan (forgot to get just a regular cake pan too), cooling rack and some tongs.
Then I hit the store with my list of ingredients to make a full on meal for myself. The menu is to include lemon chicken orzo soup, heirloom tomato bread salad and yogurt lemon cake. Unfortunately I'm only got time for the soup, but it was well worth it.
This soup was a cross between the greek lemon/egg soup Avgolemono and chicken with rice soup. It has a slight tartness from the fresh lemon juice and the protein and carbs to fill you up. My recipe turned out a little more cloudy then the picture in the cookbook, I think I might have over-whisked my egg lemon juice combo. In fact you couldn't see any of the chicken or rice but it was in there. Also I burnt my onions while whipping together the second part of the ingredients, but you couldn't taste it and it added some extra color to the soup (I omitted the carrots and celery as I don't like either cooked). Otherwise it was pretty quick to whip up and enjoy right away. I was expecting a long simmer process to be considered soup, but really in total the cooking time was under 30 minutes. The only thing I was hesitant about was another pot of hot oil and chicken (if you read my jerk chicken blog you would know why), but luckily this is a pot and not a skillet so no need to worry.
Luckily I had also purchased some artisan bread for my tomato and bread salad that I was to make (we'll try that tomorrow along with the yogurt lemon cake). So I cut off a few slices, toasted them and then rubbed fresh garlic on them for a hint of flavor. It turned out to be a very filling dinner, very tasty and lots of leftovers. I highly recommend this recipe and can't wait for fall to have lots of different soups.

Here is the recipe from the Food You Crave cookbook:

4 tsp olive oil
8 oz boneless chicken, cut into small chunks
1 med onion, diced (approx. 1 1/2 cup)
2 stalks of celery, diced
1 med carrot, diced
2 tsp chopped fresh thyme
6 cups low sodium organic chicken broth
2 large eggs
3 tbl fresh lemon juice
salt and pepper to taste.

Heat 2 teaspoons of the oil in a soup pot over medium-high heat. Season the chicken with the salt and pepper and add it to the pot and cook, stirring a few times until just cooked through (about 5 minutes). Transfer the chicken to a dish and set aside.
Add the remaining 2 teaspoons of oil to the pot. Add the onion, celery, carrot and thyme and cook, stirring over medium-high heat until the vegetables are tender (about 5 minutes). Add 5 cups of the broth and bring to a boil. Add the orzo and let simmer until tender (about 8 minutes). Turn heat down to low to keep the soup hot but not boiling.
Warm the remaining 1 cup of broth in a small saucepan until it is hot, but NOT boiling. In a medium bowl, beat the eggs. Gradually whisk the lemon juice into the eggs. Then gradually add the hot broth to the egg-lemon mixture (You can't have the broth too hot or it will cook the eggs). Add the mixture to the soup, stirring well until the soup is thickened. Do not let the soup come to a boil (again this will cook the eggs). Add the cooked chicken to the soup. Season with salt and pepper and serve.

Monday, August 31, 2009

What a Jerk of a chicken!

Tonight I got home early from a crazy day at jury duty. Almost didn't get dismissed from a 2 month murder trial. Luckily I had a vacation in the beginning of October to get me out of it. I'm already loving Yosemite just for the fact that it got me out of jury duty.
So now as I try to type this my mouth and arm are literally burning. I figured I had the time to prepared Jerk Chicken for tonight's dinner. I took careful care to chopped all the ingredients finely, even using plastic baggies when chopping up the habareno peppers and making sure NOT to rub my eyes....
But what I should have been more careful with was the HOT burning oil. In the rush of trying to get the chicken in the med-high heated oil I dropped the flatten chicken only to have a huge wave of hot oil splash up on my arm. It took about 30 seconds to realize that my arm seemed to be on fire. I ran it under the cool water washing it off with soap and looking for any immediate blistering. So far only one has appeared, but my wrist is completely red and in pain. I let the chicken brown while I rushed to the internet to look up home remedies as it wasn't so bad I needed medical attention (only feels like it).
After applying a huge amount of aloe vera gel and running it under cool water for 5-10 minutes, the chicken popped away in the hot oil, now I'm afraid to approach my oven. I finally threw in the remaining ingredients, keeping a safe distance from the hot pan. And after a few more minutes marinading in the oil, peppers, and broth it looked like it had enough.
Unfortunately I couldn't enjoy the dinner as much as I should have as my arm was killing me to cut the chicken or make any movement (like it is now) and then my mouth starting to burn with the habarenos. But I must say it was quite tasty and hopefully the leftovers will be just as good if not less painful.

Sorry no pictures as I just didn't have the motivation. Maybe tomorrow with the leftovers and less painful arm.

Sunday, August 30, 2009

What does a million dollars taste like?

Well after hiding inside from the 100 degree weather yesterday, watching Food Network and HGTV I had the idea to try to reproduce the winning recipe of the Pillsbury Million Dollar Cooking Contest. So I went online and found the recipe to Double Delight Peanut Butter Cookies that took last year's prize.
I have to tell you the recipe look relatively easy and didn't have many ingredients, so I figure how hard can it be and how can it be worth a million dollars. I headed to the store, after the sun went down so I wouldn't melt in the parking lot and got the makings of my cookies.

I would first suggest maybe doing this in cooler weather as the peanut butter balls tend to get rather warm quickly and melt in your hands. Also the Pillsbury dough need to stay cool when cutting and trying to flatten them. And having the oven on tends to add about another 10 degrees to your already warm house. But other than that the recipe was really quick simple.
Now for the taste. I can't really say I can see why they won a million dollars, of course I can't really think of any recipes that would be worth that much. But I must say I think homemade peanut butter cookies taste a lot better. Not that these tasted bad or anything but just not a million dollars worth. Also they were more like a triple delight with a ball of peanut butter wrapped in a peanut butter cookie dough rolled in peanuts and sugar. I liked the outer layer with the sugared crushed peanut mixture on it and would suggest adding that to homemade cookies.
But if I had to give a million dollars to a cookie recipe I would probably go with the Levin chocolate chip cookies from New York I found after watching Throw-down with Bobbi Flay. These cookies are massive and difficult to make, but I got the best reviews from my co-workers last Christmas when I made them (was told by one older co-woker they were the best she has ever had and she looks like she has eaten a lot of cookies in her lifetime). They are about 400 calories a cookie and have a texture of a scone, but they are well worth it and I would even say a million dollars. You will probably see them in a future blog.

Here is the Pillsbury Double Delight Peanut Butter Cookies winning recipe for you to try yourself.
Ingredients

1/4 cup dry roasted peanuts, finely chopped
1/4 cup granulated sugar
1/2 teaspoon cinnamon
1/2 cup Jif Creamy Peanut Butter
1/2 cup confectioners' powdered sugar
1 roll Pillsbury Create 'n Bake refrigerated peanut butter cookies, well chilled.

Procedure

1. Heat oven to 375°F. In small bowl, mix chopped peanuts, granulated sugar, and cinnamon; set aside.

2. In another small bowl, stir peanut butter and powdered sugar until completely blended. Shape mixture into 24 (1-inch) balls.

3. Cut roll of cookie dough into 12 slices. Cut each slice in half crosswise to make 24 pieces; flatten slightly. Shape 1 cookie dough piece around 1 peanut butter ball, covering completely. Repeat with remaining dough and balls.

4. Roll each covered ball in peanut mixture; gently pat mixture completely onto balls. On ungreased large cookie sheets, place balls 2 inches apart. Spray bottom of drinking glass with Crisco original no-stick cooking spray; press into remaining peanut mixture. Flatten each ball to 1/4-inch thickness with bottom of glass. Sprinkle any remaining peanut mixture evenly on tops of cookies; gently press into dough.

5. Bake 7 to 12 minutes or until edges are golden brown. Let cool 1 minute; remove from cookie sheets to cooling rack. Store tightly covered.